

Painting can seem like a big job! What type of paint finish should I use? Do I need primer? Do I roll or trim first? There are so many questions to ask yourself before you start painting, but with these pro tips, your mind will be at ease in no time! Plus, you might even save some time and money on your project. To get started, you first need to know what type of finish you want. Don’t worry! We’ve laid everything out in detail, including what type of paint finish is best for each room in your home.
Understanding Different Types of Paint Finish

1. Flat or Matte
- No shine, but hard to clean
- Great for hiding imperfections
- Best used in bedrooms

2. High Gloss
- Durable, glass-like finish
- Shows every little imperfection on walls
- Great for furniture, molding, cabinetry
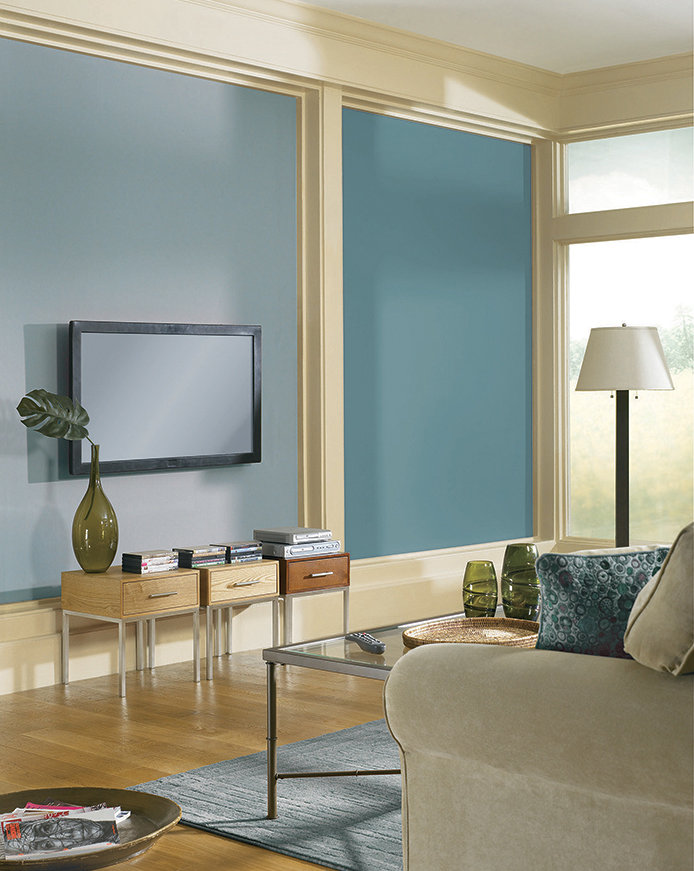
3. Satin
- High luster with a velvet-like finish
- Show application flaws, like brush strokes
- Great for family rooms, hallways, kids' bedrooms

4. Semi-gloss
- Higher shine and more sleek
- Provides protection against moisture
- Great for kitchens & bathrooms
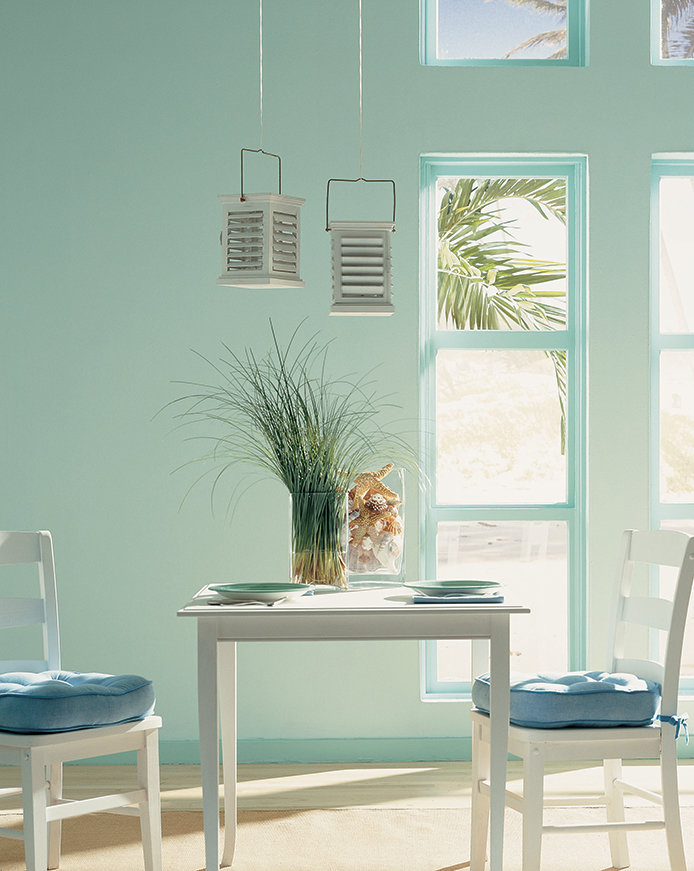
5. Eggshell
- Velvety finish with little shine
- More durable surface than flat paint
- Perfect for dining rooms
Paint Like a Pro With These Painting Tips
Try a Tinted Primer

Tinted primers can be gray or a color similar to your finish paint. Either option will help to cover your existing wall color easier requiring fewer coats. You'll also enjoy a more vibrant color!
Clear Your Room to Begin Painting

If possible, clear the entire room before you begin painting. If you have furniture that is too big to remove completely, push it into the middle of the room and cover it with plastic. For floors, you'll want to use a canvas drop cloth. Canvas is less likely to rip or tear from foot traffic, and it handles drips and splatters better than plastic. Even better, use a plastic drop cloth with a canvas over top!
Inspect and Prep Your Room Before Painting

Any cracked, flaking, or peeling areas need to be lightly sanded or scraped before applying new primer and paint. New paint can be heavy until it dries, which will pull the old paint loose. Once you sand and scrape, be sure to rinse your wall thoroughly with a damp cloth and let it dry completely before beginning. Greasy spots should be washed with soap and rinsed. Even if you don't see any greasy marks or flaking paint, it's always a good idea to give your walls a quick wipe-down with a damp cloth. Starting with a clean, dust-free surface will ensure your paint will stick and go on smoothly. You'll waste time and money if you don't properly prep your room before you begin painting.
The Correct Order to Paint a Room

If you want to paint like a pro, it's best to paint in a specific order. Pros do this to save time, and who doesn't love saving time on their household projects? First, paint your trim. You don't even have to be neat because you'll paint your walls later covering any mistakes. Once your trim is completed and dry for at least 24 hours, tape it off. Since your trim is freshly painted, use a safe-release tape. Next, paint your ceiling. Again, it doesn't matter if you get paint on your walls because you'll cover it later. Once your ceilings are dry (wait 24 hours), you can paint your walls.
For more painting tips check out - Painters Tape 101: How to use painters tape like a pro!

Learn the difference between painters tape and masking tape, which type of painters tape is best for your project, and how to correctly apply painters tape. You'll even learn how to remove painters tape without peeling paint!
How to Cut in or Trim Walls and Edges Like a Pro
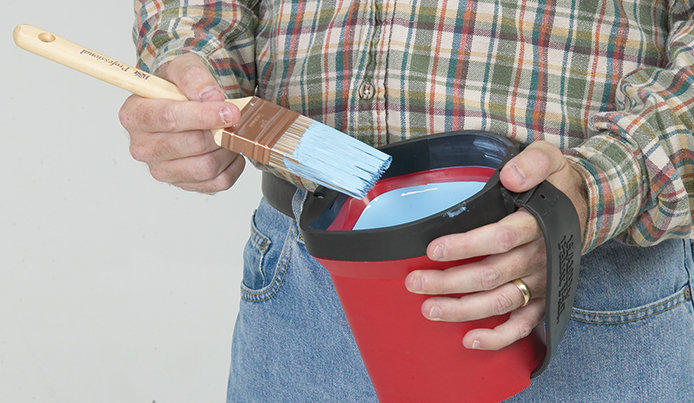
Cutting in your wall can be a very tedious task, but it sets the tone for how your overall paint project will look when finished. To make cutting in easier, try working from a painter's bucket, rather than carrying around a gallon of paint. In fact, pouring only an inch or so in your small container will prevent dipping your brush too deep. This reduces the weight on your brush and expedites cleanup if you spill paint. Get a decent amount of paint on your brush and do one swipe a little ways away from your trim or ceiling. Once your brush has less paint, you can go back through and cleanly trim next to your ceiling or painter's tape. When painting in corners, try wiggling your brush a little to help the paint soak in to every nook and cranny. Lastly, the best tip for trimming your wall is to use a good angled brush. For trimming near ceilings, a 2 1/2" - 3 1/2" brush will work best. For trim, try a slightly smaller brush that's about 2" or less.
For more paint tips, check out the Paint Brush Buying Guide: How to choose the right paint brush or roller.

You'll learn what size paint brush is best for your project, and which roller cover works best with the type of paint you're using. You'll even learn what nap size on a roller means, and which one is best for the surface you're working with.
Box Your Paint for Color Consistency

Boxing your paint may be a new concept to most because it's usually only done by painting professionals. First, you'll need to buy all of your paint at once, and make sure you have more than enough. A good paint salesperson should be able to help you estimate the amount of paint you'll need. Instead of using one gallon of paint at a time, combine all the paint into one big container, like a 5-gallon bucket. This is known as boxing your paint. Doing so will ensure your color is consistent throughout your project.
Don't have a 5-gallon bucket? Another way to box your paint is to use half of your gallon of paint and then add paint from another gallon mixing thoroughly before painting again. Always try to use the same gallon of paint for cutting in edges and rolling that same wall. Use natural breaks like corners to start boxing your next batch of paint.
Finish One Wall Before Starting Another

It may seem easier to trim your entire room at once and then roll, but fight the urge to do so! A painting tip from the pros is cutting in just one wall, then immediately rolling. You'll end up with a seamless finish because your brushed and rolled paint will blend together better. Professional painters also cover their bucket, paint tray, or whatever container they're using with a damp towel when switching between brushing and rolling. This will keep your paint and your tools from drying out.
Now, you're ready to paint your home like a pro! Shop online or in store for all your Paint & Painting Supplies!


